A bit of insulation can completely change what your garden shed is capable of. Done properly, it opens the space up as a usable workspace, hobby room, or home office, whatever the Welsh weather throws at it.
At Eden Landscapes, we have been supplying and installing garden buildings across Cardiff and the Vale of Glamorgan since 2002, and insulating a shed is one of the most practical questions our team gets asked. This guide walks you through exactly that.
Why Bother Insulating Your Shed?
A standard timber shed is designed to keep things dry, not warm. The walls are typically a single layer of feather-edge boarding, so heat escapes rapidly and condensation builds quickly. During a British winter, an uninsulated shed can feel colder inside than outside, because the timber draws in moisture and the interior turns damp and clammy.
Proper insulation addresses three issues at once:
- Heat retention – keeps warmth in during winter and reflects heat during summer
- Condensation control – reduces moisture build-up that leads to rust on tools and rot in the timber
- Noise reduction – useful if you plan to use the shed as a workshop or music room
The Energy Saving Trust rates draught-proofing and insulation among the most cost-effective ways to reduce heat loss in any building, and that logic applies to a timber outbuilding just as much as a house.
One of our Dinas Powys clients, whose Lugarde garden building we installed in 2024, told us they use it in all four seasons, including winter evenings with an oil radiator, because of the insulated floor, insulated roof, and 44mm thick wall boards.
If you are starting from scratch, our garden sheds range is worth browsing first. Choosing a shed with deeper framing from the outset makes insulating far easier. If your existing shed is sound, this is a very achievable weekend project.
Choosing the Right Insulation Material
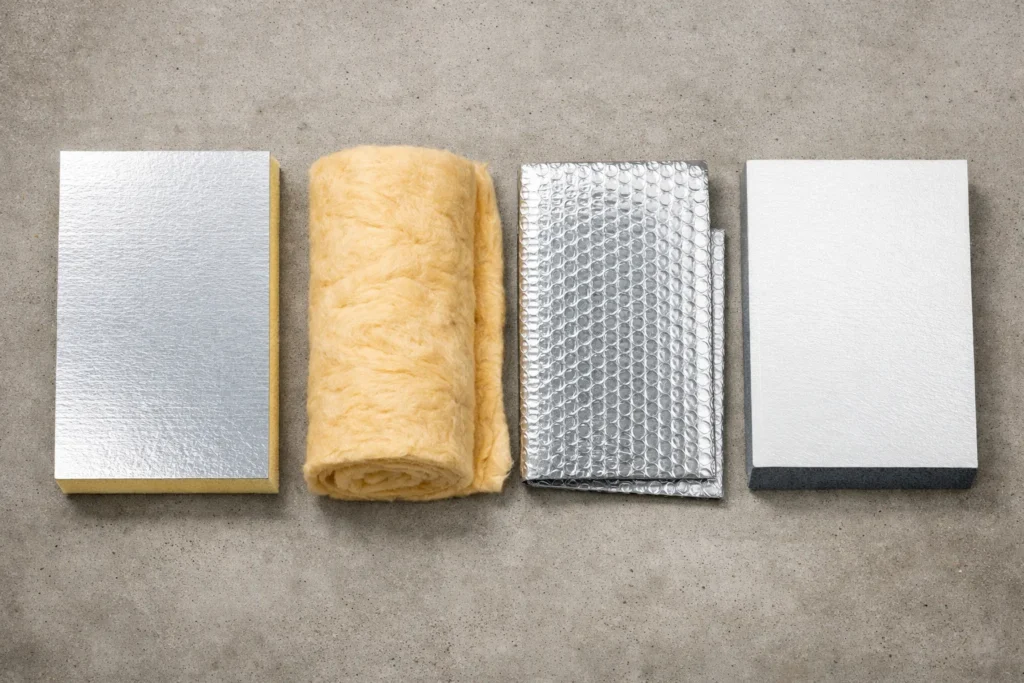
Not all insulation is equal. Here is a comparison of the most commonly used options for timber sheds:
| Insulation Type | Cost (Approx.) | Best For | Things to Watch |
| Rigid foam board (PIR/PUR) | £2-£5 per sq metre | Walls and roof | Needs careful cutting to fit snugly |
| Mineral wool (rock or glass wool) | £1-£3 per sq metre | Walls between framing | Requires a vapour barrier over the top |
| Foil-backed bubble wrap | £1-£2 per sq metre | Quick, lightweight jobs | Lower thermal performance than rigid board |
| Celotex / Kingspan-style boards | £4-£6 per sq metre | Best overall performance | More expensive but very effective |
For most sheds, we recommend rigid PIR foam boards such as Celotex or Kingspan. They offer the best thermal performance per millimetre of thickness, which matters when the depth between the shed’s internal face and outer cladding is limited. It is also the class of material used in the insulated floors and roofs across the Lugarde buildings we supply and install.
How to Insulate a Garden Shed
Step 1 – Check the Shed’s Condition First
Before buying anything, check the shed thoroughly. Insulating over damp or rotting timber is a waste of effort and money. Look at:
- The roof felt: any tears, bubbling, or lifting felt will let water straight in
- The floor joists: lift any existing floorboards and check for rot or wet wood
- The base: make sure the shed sits on a firm, level base with a small gap for airflow underneath
- Any gaps around windows and doors
If you spot rot or damp, treat or replace the affected timber before you start. Our guide on preparing your shed before winter sets in covers this in detail and is well worth reading before you begin any insulation project. We stock Barrettine wood preservative at our Wenvoe show site, and a couple of coats on bare timber will give you a solid foundation to work from.
Step 2 – Insulate the Floor
The floor is responsible for significant heat loss, particularly over a concrete base or bare earth. UK guidance on floor insulation confirms the approach: lay rigid foam boards between the floor joists and replace the boards on top. For a solid floor, lay boards directly on the concrete and cover with OSB or plywood. Aim for at least 50mm thickness throughout.
Our Lisvane 2024 client’s 6.2m x 2.9m Lugarde workshop, with 68mm wall boards and an insulated floor, is used as a working workshop through the South Wales winter without supplementary heating.
Step 3 – Insulate the Walls
This is the most involved part, but it makes the biggest difference to comfort. Most timber sheds have a simple frame: uprights (studs) at roughly 600mm intervals with cladding fixed directly outside. The gap between those studs is your insulation zone.
The process for insulating shed walls:
- Measure the stud depth and spacing carefully
- Cut rigid foam boards to fit snugly between each stud
- Push the boards firmly into position, ensuring no gaps at the edges
- Tape any joints with foil tape to reduce air movement
- Add a layer of polythene vapour barrier over the entire wall, stapled to the studs
- Fix your internal lining, typically 9mm OSB or plasterboard, over the top
If the studs are shallow (25-30mm is common on budget sheds), fix timber battens first to increase the cavity depth. Shallow stud depth is the most common structural constraint we see when customers bring photographs of their existing shed into our Wenvoe show site.
Step 4 – Insulate the Roof
Heat rises, so the roof is the most important area to insulate properly. For a felt-covered apex or pent roof, the process is similar to that of the walls.
Cut rigid foam boards to fit between the roof rafters, push them firmly up against the inside of the roof deck, and seal the joints with foil tape. Leave a small ventilation gap of around 25mm between the top of the insulation and the underside of the roof deck to prevent condensation forming. Guidance on roof and loft insulation stresses the importance of that gap to keep the roof void dry.
Finish with a vapour barrier and then your internal lining board.
Step 5 – Draught-Proof Doors and Windows
All that insulation work will be undermined if cold air pours in around the door frame or through a rattling window. Use a self-adhesive foam draught strip around the door frame and check it closes squarely. Fit a door brush for any gap at the bottom, and check the window putty or beading is intact. Double-glazed units, standard on the Lugarde buildings we install, eliminate this problem.
Heating the Insulated Shed
Once insulated, a modest heat source goes a long way. Popular options include:
- Electric panel heater or oil-filled radiator – safe, controllable, and no flue required; ideal if you have a power supply
- Infrared heating panel – energy-efficient and heats objects rather than air, which suits intermittent use well
- Small wood-burning stove – requires a proper flue installation and clearance from combustible materials, but very effective in a larger shed
Always ensure adequate ventilation when using any heat source, and have all electrical work carried out by a qualified electrician.
Do You Need Planning Permission to Insulate a Shed?
In most cases, no. Adding internal insulation is routine maintenance, well within permitted development rights. If you plan to alter the external appearance or change the building’s use, the Planning Portal’s outbuildings guidance is the clearest official reference for what requires permission in England.
If your insulation project is part of a wider conversion or upgrade, our dedicated guide on planning permission for garden rooms is a useful starting point.
When Insulating Is Not Quite Enough: Consider a Garden Room or Office
Sometimes an older shed, no matter how carefully insulated, will not reach the standard you need. Thin framing, a single-skin roof, and walls worn down by years of Welsh winters all have their limits.
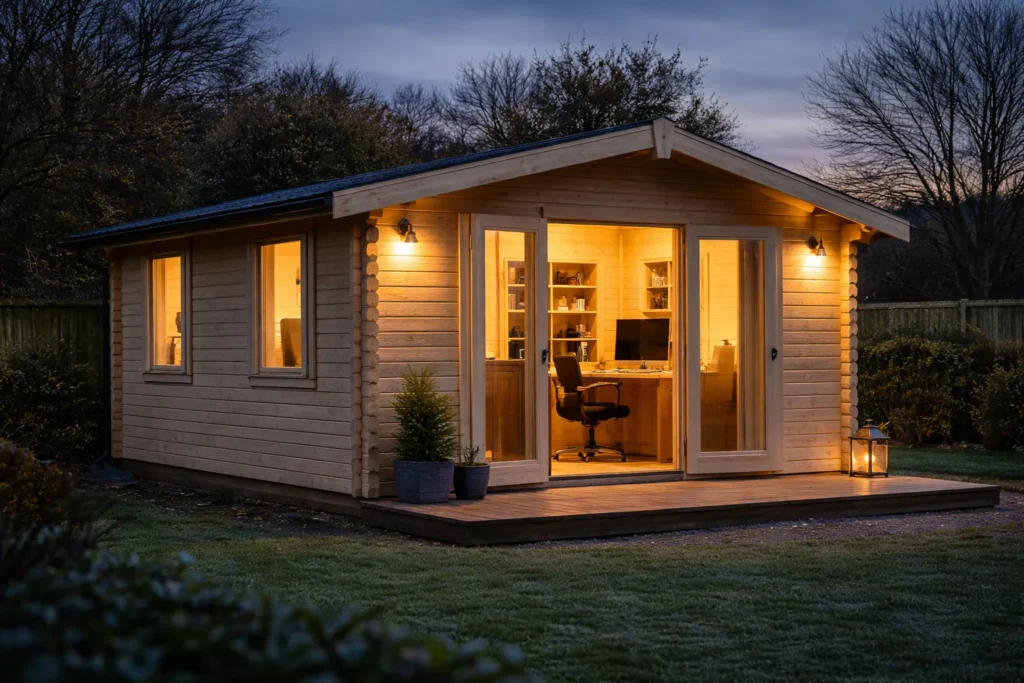
If you are using the space seriously, as a home office, creative studio, or gym, it may be worth considering a purpose-built building instead. Our garden rooms and offices range covers everything from compact office cabins to larger log cabin-style buildings, designed from the ground up for year-round use with thicker walls and higher-grade cladding. Directors John Whitney and Jamie Bloomfield, who founded Eden in 2002 and opened our Wenvoe retail site in 2014, are on hand to help you think through the options.
Our overview of why a garden room transforms how you use your outdoor space is a good starting point, and our customer case studies and testimonials show how homeowners across Cardiff and the Vale use their garden buildings year-round.
Ready to take the next step? Visit us at Pugh’s Garden Village, Wenvoe, Cardiff CF5 6AD, or call 029 2059 7365. Our team will help you find the right building for your space and budget.
The Key Takeaway
Learning how to insulate a garden shed properly is one of the most cost-effective ways to get more from your outdoor space. A well-insulated shed retains heat, resists condensation, and gives you somewhere comfortable to work or create, even on a grey January afternoon in South Wales. Whether you are retrofitting what you have or starting fresh, come and visit us in Wenvoe.